When I saw Western Digital (WD) coming out with a Wireless Hard Drive with SD Slot support, I was pretty excited. I couldn't wait and was searching for many other alternative but could not find one that matches this in terms of specification and functionality.
I am located in Singapore so I even posted in WD Singapore Facebook page to ask and finally it was release and sold in Singapore Sitex 2014 (an IT show in Singapore held during first week of Dec). The cost of it was SGD299 for 1TB and SGD399 for 2TB with a 16GB SD card and some other freebies which I am not attracted to.
It was something I felt too heavy to swallow. I like the SD slot availability as I took photo using my camera and it would be good to have such a storage that automatically move my picture to a storage and have my SD card free for use again which means less SD cards to purchase and carry.
It was also Black Friday followed by Cyber Monday and Green Monday in US. So I decide to have a look at Amazon which they do ship to Singapore. I was caught with USD219 for 2TB model and it comes with a 16TB Transcend UHS-1 Class 10 SD card as a promotion. I wasn't able to assure if I made an order from Amazon which is a US set be warranty in Singapore. After some research I came across WD support statement here. So I was now assure as an end user I will be eligible. And so I made the purchase.


There is a small slip of paper which is the quick installation guide. Other documents including Product Overview can be found here. There is also a user manual for it.
Let's take a look on the Hard Drive.
 On one side, you will find the Power button, USB 3.0 connector and the WPS button which also adds as copy/move when briefly press when the hard drive is powered on.
 On the left side (when power button is facing top), is the SD slot. WD include a dummy to keep it occupied since this is on the outside unlike camera's SD slot, dust or small items might end up in here. With a dummy slot in prevents this.
 When you power on the device, you will find the LED lights up. The first one on top with the thunder sign indicate power and the percentage it of power remaining from Fully Charge (Blue>green>Yellow>Red) to low power. The LED below is the Wifi been turn on. Do note when you plug the Hard Drive to a Laptop, only the power light will be on in White. Upon still plug in with ejected mode, the Wifi will be turned on or when it is plug to a power source other than a laptop.
First time
First time when powering on, you will find the WiFi hotspot name "MyPassport", when joined to that, you will be connected to the hard drive. Just key in the address in the web browser http://mypassport.local and you will be brought to the Administration page.
Home Section

 The Home section, show you the Capacity, on clicking the Capacity section it will switch between number of files for each file category and size. You will also see the remaining space, the power remaining, the Wifi information as well as the firmware.
On the top is Shortcut (where you create a shortcut to connect to the drive), Notification (information like firmware upgrade, etc. are shown), Question and Support (where you find links to documents and support site).
Wi-Fi Section

In this section, you will see who is connected, typically will be one person; yourself. On the right, is the available Wifi hotspot around the area. You can turn on and off the Wifi, by default I left it on.
 In the middle, you can see your SSID for your hard drive and you can
change the SSID, in my case I have changed it. You can include a
key in order to join for security reasons. You can setup DHCP service to allow issuing of IP when a device joins to the Hard Drive network. You can also hide your SSID if you want to be super secure.
In the middle, you can see your SSID for your hard drive and you can
change the SSID, in my case I have changed it. You can include a
key in order to join for security reasons. You can setup DHCP service to allow issuing of IP when a device joins to the Hard Drive network. You can also hide your SSID if you want to be super secure.
 If you click on any of the Wifi hotspot, you will be shown the screen above to enter the details to join.


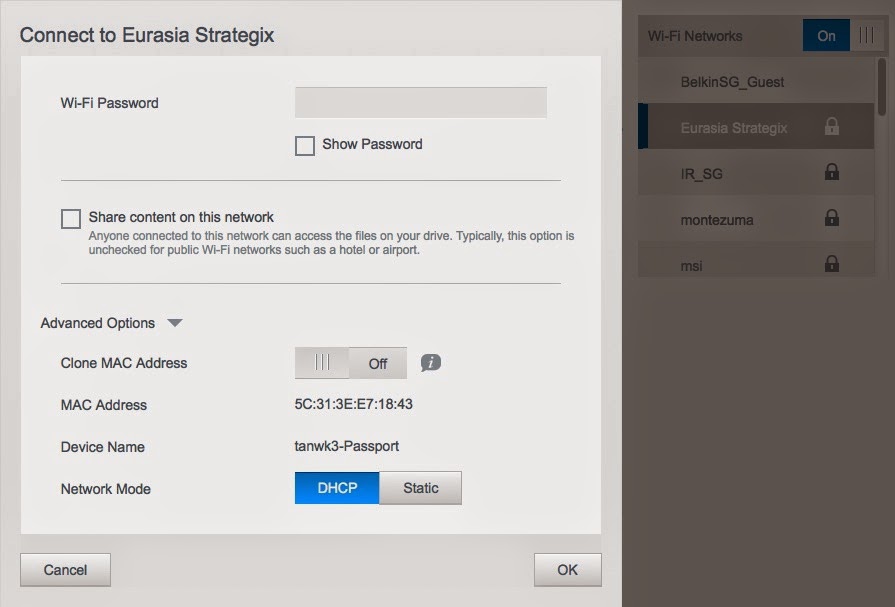
 If a hotspot is already joined before hand, clicking on it shows the above where you can forget the network. Here you can choose to receive DHCP IP or specify a static IP depending on the network joined. You can also clone your machine MAC address if the WiFi hotspot has MAC address filtering.
In both cases, you can choose to allow or not allowed to share your hard drive via the Wifi network. If you choose to share, user using their laptop will be able to scan the network and access the drive.
Admin Section
 Under this section, you can choose to create password whenever there is changes made to the hard drive setting. You can change the drive name but by changing the drive name, the next time you browse
the admin page, you will have to change to the new drive name.
Under this section, you can choose to create password whenever there is changes made to the hard drive setting. You can change the drive name but by changing the drive name, the next time you browse
the admin page, you will have to change to the new drive name.
SSH and FTP services are provided. I find SSH not much used unless support provide you some guideline else playing around with it might just get your drive haywire.
FTP is useful for camera that have a WiFi auto download or using SD card like Eye-Fi. Refer to the user guide given at top of this post to find out the details.
Hardware Section
 Here you can choose the Hard Drive to be in Performance or Power Saving state. This is self explanatory. You have to sacrifice Power for performance. I did not perform any Read/Write test here as you got to be fair which setting is used. You can search for some of the test done by other reviewers. Also the test to carry out will need to be done with either 4 or 8 kb block which also depends on what type of files and size will mainly occupy in this hard drive. So such test are subjective. For me, I can wait just that few seconds to get things done.
You can also Shutdown the drive or reboot it.
Media Section
 From the screenshot you can see that here you can use DLNA. It also shows the Media count here. You can rebuild both the databases if you find it having inaccurate information.
Here you will also set your SD Card setting to Copy or Move. For me, my purpose is to free up my SD card, I have selected Move. You can set to automatic so when a SD card is sloted, it will automatically perform the action else you can briefly press the WPS button on the hard drive to start the process. If you are not on automatic, you can start the copy/move process.
Support Section
 Here you get to download system reports for troubleshooting and run some Hard Drive diagnostics. You can also opt-in to improve this hard disk interface which I encourage everyone to do it so there will be improvement be done.
Firmware Section
 Lastly, here you can either download the firmware (if you are connected to a Wifi hotspot with Internet) or someone can copy the file after downloaded and place into the SD card under Update folder, or just upload the file. The update file should be in .bin format. For me I actually downloaded it and did a Manual Update.
 Just to take a look how the folders and file will be placed like. Each SD Card will have it's own folder under Public>SD Card Import> Card Model. For SD card that are slotted in the hard drive can be accessed too. You see the Upload folder meant for Wifi connected.
WD My Cloud
At the time of writing, this mobile app was recently update and resulted in crashing upon opening. So I was not able to test this using Samsung Galaxy Note 8.
19 Dec 2014 Update: I was able to launch WD My Cloud after changing to Sony Z3. Seems like its device specific. You will need to be connected to My Passport Wireless Wifi hotspot even though if is is joined to your home network else you will not be able to access it.
After joining My Passport Wireless Wifi hotspot, you will see it pop up in WD My Cloud application. Clicking on it allows you to view the various options.
It is able to do the same via the web interface. The browsing of the files and folders are acceptable however loading pictures seems rather slow showing the thumbnails.
You will have internet access if your My Passport Wireless is joined to a network that has Internet access.
Verdict
In summary, WD My Passport Wireless did a great job. I like the web interface is nicely done and its simple to use. However the mobile app need to be improved and is not usable since the last update before this was written.
Pros
Cons
I am located in Singapore so I even posted in WD Singapore Facebook page to ask and finally it was release and sold in Singapore Sitex 2014 (an IT show in Singapore held during first week of Dec). The cost of it was SGD299 for 1TB and SGD399 for 2TB with a 16GB SD card and some other freebies which I am not attracted to.
It was something I felt too heavy to swallow. I like the SD slot availability as I took photo using my camera and it would be good to have such a storage that automatically move my picture to a storage and have my SD card free for use again which means less SD cards to purchase and carry.
It was also Black Friday followed by Cyber Monday and Green Monday in US. So I decide to have a look at Amazon which they do ship to Singapore. I was caught with USD219 for 2TB model and it comes with a 16TB Transcend UHS-1 Class 10 SD card as a promotion. I wasn't able to assure if I made an order from Amazon which is a US set be warranty in Singapore. After some research I came across WD support statement here. So I was now assure as an end user I will be eligible. And so I made the purchase.
Once the item arrive, I was excited. Upon opening, I saw the power adapter (WA-10L05RU) with empty slots which I wonder what could it be. Well after checking out, as this is a US set, they do not provide the 2-pin and 3-pin parts for the adapter which can be used in any region supporting 120V-240V. Not a problem with a converter that will solve the problem. I did search for the power adapter model and found that they are sold on taobao. So if you need it you can get it like SGD10 or less.
There is a small slip of paper which is the quick installation guide. Other documents including Product Overview can be found here. There is also a user manual for it.
Let's take a look on the Hard Drive.
First time
First time when powering on, you will find the WiFi hotspot name "MyPassport", when joined to that, you will be connected to the hard drive. Just key in the address in the web browser http://mypassport.local and you will be brought to the Administration page.
Home Section
On the top is Shortcut (where you create a shortcut to connect to the drive), Notification (information like firmware upgrade, etc. are shown), Question and Support (where you find links to documents and support site).
Wi-Fi Section
In this section, you will see who is connected, typically will be one person; yourself. On the right, is the available Wifi hotspot around the area. You can turn on and off the Wifi, by default I left it on.
If you join a Wifi hotspot, you will be shown the above screen. Wait a few moment for it to join. It takes some time. Once connected, you will see a check on the network you joined. Once connected, you will have Internet connection (if you Wifi hotspot have access) for your laptop. It seems that the hard drive did a NAT service. But do note the drive do get pretty hot if this is used intensively on WiFi. This is pretty useful when you are in a Hotel where you want to extend the use of a physical Internet Connection to WiFi in your room.
In both cases, you can choose to allow or not allowed to share your hard drive via the Wifi network. If you choose to share, user using their laptop will be able to scan the network and access the drive.
Admin Section
SSH and FTP services are provided. I find SSH not much used unless support provide you some guideline else playing around with it might just get your drive haywire.
FTP is useful for camera that have a WiFi auto download or using SD card like Eye-Fi. Refer to the user guide given at top of this post to find out the details.
Hardware Section
You can also Shutdown the drive or reboot it.
Media Section
Here you will also set your SD Card setting to Copy or Move. For me, my purpose is to free up my SD card, I have selected Move. You can set to automatic so when a SD card is sloted, it will automatically perform the action else you can briefly press the WPS button on the hard drive to start the process. If you are not on automatic, you can start the copy/move process.
Support Section
Firmware Section
WD My Cloud
At the time of writing, this mobile app was recently update and resulted in crashing upon opening. So I was not able to test this using Samsung Galaxy Note 8.
19 Dec 2014 Update: I was able to launch WD My Cloud after changing to Sony Z3. Seems like its device specific. You will need to be connected to My Passport Wireless Wifi hotspot even though if is is joined to your home network else you will not be able to access it.
After joining My Passport Wireless Wifi hotspot, you will see it pop up in WD My Cloud application. Clicking on it allows you to view the various options.
It is able to do the same via the web interface. The browsing of the files and folders are acceptable however loading pictures seems rather slow showing the thumbnails.
You will have internet access if your My Passport Wireless is joined to a network that has Internet access.
Verdict
In summary, WD My Passport Wireless did a great job. I like the web interface is nicely done and its simple to use. However the mobile app need to be improved and is not usable since the last update before this was written.
Pros
- Simple to use web interface.
- Using the WiFI hotspot from the hard drive to gain Internet access especially in a Hotel room.
- SD Slot able to perform automatic copy/move.
Cons
- Battery life will be an issue if WiFi is constantly been used.
- Connection to the drive to WiFi network can be faster.
- Brief press of WPS to copy/move file from SD card has not visual indicator process executed.
WD My Cloud mobile app is not working.Working on certain device.
No comments:
Post a Comment
Comment will be published once confirmed not advertisements.