Amazon Banner

Saturday, March 7, 2015

The Wheelie: Electric Unicycle

Have you seen occasionally people riding on an electronic unicycle on the road?  I saw some on the road and came across some mention in blog and forum and end up locating Singapore local Unicycle Community that is called, The Wheelie.  They have a facebook page and a blog which you can follow them on.  They are many others .e.g Solowheel, Airwheel, etc.  Some will cost you a bomb.

I decide to get from them as they are like a start up community with common interest individuals.  There are many sources your can get this, but most are out to do commercial sale with you or you can even order from Taobao, but no one is going to teach you  Also if you hit problem with your unicycle you will want someone you can get attention from.  No matter who you get it from make sure you have some kind of warranty coverage.

They are picking up popularity that they were featured in Ch5 and Ch8 programs.  I happen to met up with one of the founder who 1) I won a selfie stick from their Christmas contest and 2) I bought my first electric Uni-Cycle on Valentine's Day!

So I met up with Colin who came with my unicycle and the handle that can be fitted with the Wheelie at a multistorey carpark as he is going to give an hour of training on it.  Yes they do delivery to you and teach you at places near you.

Here it is the box is look big.

The power adapter in here and safety strap which is not shown here.

The Wheelie is right underneath with the learning wheels.

They even have their decal sticker on it.  But it looks good better than a plain white wheelie.

To learn this unicycle, you would need the safety strap for safety not for learning.  As you will wear out your calf when trying to first learn it, they actually throw in a free calf support so as to reduce the bruises you might get learning.  How thoughtful!

As I bought the model known as R8, you looks pretty but the material of the plastic is of a more towards what you see on phones vs the lower end model where its like industrial plastic.  In such, it is best to cover some of the parts where you lightly crash you wheelie.  Every set you purchase some with a pack of rubber stickers for you to wrap your unicycle.

Colin just gave me some left overs as well.

I am not a artistic person so here is my attempt to doll it up with protection.


It's not looking good perfectly but its better than crashing up my unicycle right.  This R8 is not light so I purchase the handle bar as well.  Just in case I need to carry around much easier.

Since my unicycle is new, and was without any protection, Colin was nice to lend me his to teach me throughout the one hour.  Do note it is very tiring and exhausting if you are someone who seldom exercise, you might just end up stopping after 30 minutes that what Colin share with me.

During the session, I was able to mount on and ride a short distance.  However everyone learning period is different I am not going to give you hope that during the first time you will be able to do it.  Perhaps my experience with roller blading and ice skating do help here.

Yes I dent a few spots on the wheelie.  Sad but well its comes with the first few try but its not obvious as I have all the bumper cushioning it.

The Wheelies do hold weekly meet up if you are keen to try it out by referring to their Facebook page.


Update 8th Mar 2015
Today is the first time I joined The Wheelies for a group session.  Thanks for my fiancee who allows me some times off to join this.  It was a fun group of people.  This was my 3rd time testing out my Wheelie, 1) when I bought it, 2) I brought it to test run myself for an hour trying to learn, 3) this group outing.  I also get to see the amazing kid who was able to do all stunts.

There were a few people who came up to us to enquire of the unicycle.  They get to try a bit.  Hope to see more people around.

 Waiting for the everyone to catch up for a phototaking.

Look at the different Wheelies from all the users.  Majority are purchased from The Wheelies while there are some who bought themselves from some other sources.  the community does not stop you where you get it from to join the fun!

 One photo taking pit stop.

Another stop.

As I am new, some of them accompanied me but slowly but surely you will pick up your speed to learn.  Of course safety is very important and I experience it the hard way.  I fell due to speeding and losing control of the wheel when it try to slow me down.  So be WARNED! Do not speed with it unless you are full protected and even if you are, its advisable not too unless you are eager to pay "road tax".  Here is what I pay for:

I am considered a fast learner able to wheel using just 3 tries.  That does not mean everyone can do that.  You will need to practice.  It might be my roller blading background that helps me.

Wheel safe.

A short video while on my wheelie.  Do not try this till you are confident of it.  I am just been too eager to do it :)


Wednesday, February 11, 2015

Google Play Store: Changing Purchase Currency

I am based in Singapore and I wanted to purchase an app on Google Play Store.  The app is called WatchMaker which cost USD1.99 however I am seeing the price of SGD2.99 this is due to location and SIM card is bearing a Singapore number.

Making a calculation the exchange rate I am getting from Google for this app will be 1.5.  This is crazy.  At current my credit card company is only charging me 1.38 at worse.

Do note not all apps are using this exchange rate.  For example, I tried another app, Facer Watch Face which is showing SGD1.35 with my local Singapore SIM Card.

The app actually cost me USD1.00.  So in this case the exchange rate was 1.35 which is much lower than my credit card company.

So how can you change your currency of payment since if your SIM card is in Singapore the Play Store will always use SGD no matter where you are even when you are oversea roaming (Yes I tried that in US).

First I have actually set up my Google Wallet Profile account address in Singapore.  That makes Play Store always use SGD as my payment.  In order to change to USD, I have to change my address to a US address.  You can use any address you can find.

First Login to your Google Wallet .
Click the Gear Icon on the top right hand corner.

Next Edit your Home Address.  This will cost Google Play Store to make your payment currency in respect to the home address.  In my case, USD for a USD address.

Here I am going to use the app, Facer Watch Face as an example. you will see it is price at $1.35 (this is actually SGD because my SIM card is Singapore SIM).  Click on the Buy button, you will be shown the below:

The purchase will not be made till you confirm you payment method.  You can add or change them by clicking the arrow of the drop down list.  This shows all your payment method you have created in Google Wallet.  You will see that the cost here is now in US$1.00.  So now I will be charge USD1.00 instead of SGD1.35.

Do note that if after changing your Google Wallet, if you are NOT seeing this refection on your phone (on play.google.com that should already be working), you will need to go to your App Manager and do a uninstall of all the update and clear the cache.  This should be located in your Phone Settings menu, look for App or App Manager, etc.  After which restart your phone to also reflect this change on your mobile Google Play Store else it will always be showing SGD price even after clicking Buy button.

Of course to change back, you need to update your Account Home Address to a Singapore Address again and repeat the above for your phone setup.

I hope this tip will help you resolve your wondering.

Monday, February 9, 2015

Reduce Singapore Income Tax in Summary

I have been asked by many and like to share this out with the help of a friend, Hwee Bing Koh, a financial adviser from fin-exis.

For all individual employed or self employed updated as of Jan 2015 2025.

Some of the ways you can reduce your assessed income tax.  Some are automatic credited due to it is based on what is announced during Singapore Financial report while the rest are ways you can do it yourself.
https://www.iras.gov.sg/irashome/Individuals/Locals/Working-Out-Your-Taxes/Deductions-for-Individuals--Reliefs--Expenses--Donations-/

You can also download a spreadsheet from here to do your own calculation.

Here are some of the ways which would you can help yourself to reduce tax:

For Self Employed Only
- Perform a voluntary CPF contribution to a maximum of $31,450 $37,740
Source:
https://www.iras.gov.sg/taxes/individual-income-tax/basics-of-individual-income-tax/tax-reliefs-rebates-and-deductions/tax-reliefs/central-provident-fund-(cpf)-relief-for-self-employed-employee-who-is-also-self-employed

Course fee relief
- Up to $5,500 from an approved institute or qualification including exam fee incurred by yourself not by company.  You can refer https://www.iras.gov.sg/IRASHome/Individuals/Locals/Working-Out-Your-Taxes/Deductions-for-Individuals/Course-Fees-Relief/

Cash CPF Top up for loved ones up to $7,000 $8000 or your own RA or SA
- Spouse not earning an annual income exceeding $4,000 or parents, grandparents, disabled siblings or disabled spouse has no income cap.
- Top up your own RA or SA up to$7,000 $8000 not exceeding the minimum sum stated or maximum of FRS amount whichever come first
Source: https://www.cpf.gov.sg/member/growing-your-savings/saving-more-with-cpf/top-up-to-enjoy-higher-retirement-payouts
- Top up your loved ones/siblings SA (below 55 annual income not exceeding $4,000 a year), or parents RA (above 55) up to $7,000 $8000
Source:
https://www.iras.gov.sg/taxes/individual-income-tax/basics-of-individual-income-tax/tax-reliefs-rebates-and-deductions/tax-reliefs/central-provident-fund-%28cpf%29-cash-top-up-relief

Cash Top up to self
- Maximum of $7,000 $8000 allowed
- Only to Special or Retirement Account
https://www.cpf.gov.sg/member/growing-your-savings/saving-more-with-cpf/top-up-your-medisave-savings 

Volunteer Contribution to CPF
- Contribute to your Medisave Account (inclusive of Mandatory Contribution) as of 2015 (assuming you have not hit your maximum allowed contribution) based on CPF Annual Limit or Medisave Contribution Limit whichever is lower.
Source:
https://www.iras.gov.sg/taxes/individual-income-tax/basics-of-individual-income-tax/tax-reliefs-rebates-and-deductions/tax-reliefs/central-provident-fund-(cpf)-cash-top-up-relief 
https://www.cpf.gov.sg/member/growing-your-savings/saving-more-with-cpf/top-up-your-medisave-savings 

Life Insurance Relief
- Insurance should be insured of yourself.
- You total annual contribution to CPF is less than $5,000
- Insurance should be insured of yourself. Have your insurance policies details (policy number and premium amount etc) when you do your filing.Source: https://www.iras.gov.sg/IRASHome/Individuals/Locals/Working-Out-Your-Taxes/Deductions-for-Individuals/Life-Insurance-Relief/
 
Parents Relief (as of 2014)
- up to $9,000 per parent or $14,000 for handicapped parent (parent annual income not exceeding $4,000)
- Parent must be staying with you if not staying with you $5,500 or handicapped parents $10,000
- parent is not working and no others is claiming the relief

Source:
https://www.iras.gov.sg/IRASHome/Individuals/Locals/Working-Out-Your-Taxes/Deductions-for-Individuals/Parent-Relief-/-Handicapped-Parent-Relief/
The relief amount may also be found at http://www.singaporebudget.gov.sg/budget_2014/Families1.aspx (New higher parent relief for YA2015)

Child Relief/Rebate
- Per child relief of up to $4,000
- Per child rebate can be from $4,000 onwards

Source:


Less expense
- keep your receipts for amount paid by you for work in terms of public transport and mobile and record of your transaction which a planner can be downloaded from the link below (typically applicable for those getting an allowance.  Need to keep the receipt for audit purpose.)
Source: https://www.iras.gov.sg/IRASHome/Individuals/Locals/Working-Out-Your-Taxes/Deductions-for-Individuals/Deductions-on-Employment-Expenses/

Open a Supplementary Retirement Scheme account from local banks with top up a maximum of 12,750 or 29,750 for Local and foreigner respectively.
Source:
https://www.iras.gov.sg/taxes/individual-income-tax/basics-of-individual-income-tax/special-tax-schemes/srs-contributions

Update: From 2016 onwards, the contribution allowed for Singaporean and PR is $15,300.
https://www.iras.gov.sg/irashome/Individuals/Locals/Working-Out-Your-Taxes/Special-tax-schemes/Supplementary-Retirement-Scheme--SRS-/SRS-contributions/


Donations to registered bodies
- 2.5 times (3 times from 2015) the amount donated less your assessed taxable income
Source:
https://www.iras.gov.sg/IRASHome/Individuals/Locals/Working-Out-Your-Taxes/Deductions-for-Individuals/Donations/
- Giving made simple by going to SG Gives, https://www.sggives.org/Public/5/Content_fordonors.aspx
- By providing your NRIC number to the Institute of Public Character (IPC), and you will enjoy the convenience of tax deductions automatically reflected on your tax assessment.  You can find out if a charity organization is under IPC here.

Lastly there is also Earned Income Relief
This is automatically included in your tax relief however the normal range is for individual below 55 year old is $1,000.  Occasionally this can be higher depending from Financial Announcement made.
Source:
https://www.iras.gov.sg/IRASHome/Individuals/Locals/Working-Out-Your-Taxes/Deductions-for-Individuals/Earned-Income-Relief/

There is also NSman Relief for guys serving reservist which you can read more about it here.  This is also an automatic relief nothing to do on your part.

Lastly, there is maximum income relief allowed per person per year up to $80,000 for FY2018.


Update 12th Jan 2025
  • Changes to the maximum top$7000 to $8000
  • Top up Medisave account and added the limit link
  • All links are updated due to revamp from IRAS and CPF website

Update 1st Mar 2022
  • Child relief/rebate

Update 15th Mar 2021

Update 16th Oct 2017
  • Update link to reflect latest.

Update 12th Nov 2015
  • IRAS site have been updated and links above are updated to reflect the new site.

Wednesday, January 21, 2015

WhatsApp Goes On Web

As announced by WhatsApp on their blog and with the latest update of WhatsApp release 21st Janurary 2015 starting on Android 2.11.498 (Sorry for iPhone users this is not available at time of writing).  This is similar to the WeChat feature.

A few snapshots, you will need to use Chrome browser (yes only Chrome is supported at this launch), You will go into your mobile phone Whatsapp and under the menu, choose WhatsApp Web and scan the QRCode on the browser at https://web.whatsapp.com/ and you will be brought to your existing chat.

You can also see which machine you are log into using your mobile WhatsApp and log out individual or all together.

One thing which may or not be a good thing is thatyou can choose to keep sign in the Web WhatsApp opened in the browser, once you are back online, Web WhatsApp automatically gets connected back without having to perform the QRCode scanning again.  This is unlike WeChat which will initiate a timeout and no option to stay sign in.

Do note this new feature require data connection for your mobile so if you have limited data you have to be careful.

The good thing different from WeChat, you will see your existing messages unlike WeChat that will display no history but starts from where you connected to the web interface.  The bad here is you need data to be transmitted from phone to Web Interface.

I do welcome this function as it helps for people who are on laptop to response much faster.  For those at work, you do not get caught using your phone too often as well.

Android WhatsApp menu

Scan the QRCode with option to stay sign in


Chrome WhatsApp Interface

Viewing your login status on all device

A teaser what if your mobile phone is low on battery?


Sunday, December 28, 2014

Switch from Samsung Galaxy Note to Sony Xperia

I was an avid Apple user but started to switch to Android after using the first Android phone Samsung Galaxy Note.  Then on I moved from Galaxy Note 2, Note 3 and eventually winning a Note 8 during a Samsung Galaxy Note 8 fans' event.

Sadly my last experience with Samsung Galaxy Note 3 was a short one and disappointing one.  The screen started to occur on off yellowish stint on the AMOLED screen on and off.  I sent it to the service center twice over a period of months and a software reset was done on both occasions.  The third time was after a splash of water the day before and it was told the screen has corrosion and it will be chargeable (even under warrranty) over SGD600 to service it.  With that price I could have got a new set off the shelf!  Though it was my fault getting it splash by water, even storing it in dry both and cleaning the internal completely, coming from an engineering background tells me corrosion does not happen over night.  As I am an active person who goes running with my phone on and off, I thought it was due to this reason.

Few days ago, my friend who owns a Samsung Galaxy Note 3, encounter the same problem in front of me with that yellow stint appearing on and off.  Before I could take a picture of it, it returns to normal.  My friend who not active person kept the phone in dry condition.  With the witness of this incident, it seems that Samsung device generally Galaxy note 3 is prone to; Corrosion. I believe this is due to the high humidity in Singapore where I am located, the phone gets corrosion easily inside the phone!  With such an experience, I decide to switch to a phone that has water and dust resistant, definitely that would not be Samsung Galaxy S5 as a friend of mine have to send to service after the phone power off by itself suddenly and refused to power on in less than a month!

Enough of my dismay, I was loving Samsung Galaxy Note series due to the S Pen.  However I was wondering how can I do without it making a switch.  I was very tempted to get Samsung Galaxy Note 4 or Edge, however I encounter the usage of Galaxy Note Edge design pretty useless (mainly its a right handed phone and lightly the next iteration will be double screen edge) and easily damaging the screen by accidental drop.

The verdict why not Galaxy Note 4?  Well another friend of mine who got the Galaxy Note 4, tried the *#0*# test and guess what?  The touch test have one straight area of fault.  How on earth did the phone pass the QC test?  Didn't Samsung QC this via the test?  With many complains of Galaxy Note 4 (all screen related) on their Singapore Facebook page, I decide to drop the idea completely and not to face with the same warranty issues paying for the most expensive Android phone.

Here a Samsung Galaxy Edge demo set encounter screen distortion issue.  Are you kidding me so many screen issues?


I have been Sony Xperia Z3 for more than a week now, I am going to review this phone in sections comparing this with my previous Galaxy Note 3.  Moving forward if you didn't catch the news, Sony Mobile is going to focus on premier phones instead of market share.

The hardware specification in terms of CPU and Memory is the same other than Sony Xperia Z3 uses Snapdragon 801 while Samsung Galaxy Note 3 is on Snapdragon 800 both has 3 GB of memory and with Note 3 32 GB of storage and Sony 16 GB.

Body
The body of the Sony Experia Z3 is front back with glass.  Apparently I tested it pouring water over it and it seems like some coating is on top of it where water does not stay on it.

The edge is surrounded by rounded metal with the four corners with soft material suppose to block a fall.  This design looks similar to Apple iPhone 6 perhaps that's was how it was copied from since Apple iPhone 6 was launch later this year while Sony Xperia Z3 was beginning of the year.

So I got a transparent case for my Sony from Qoo10 as well.  It even has a stopper for the ear jack.  Since Sony is already waterproof this is just added protection.  The side where the dock charger is rather lose due to the thin line covering over the edge.  But not a problem just need a cover over the phone.

Samsung Galaxy Note 3 is totally plastic front, back and side.  Nothing much to shout about.  In fact, a little water droplet and your phone might be in for corrosion.  I tested it my faulty Note 3 and place a drop of water on the screen and move the water droplet and realize it is able to sip into the edge where the glass and the edge touches!  I am not able to test this on Galaxy Note 4 or Edge, but since quality of the NOte series are dropping each release, I assumed this will be the same even though now they change from plastic to metal.

Overlay
Sony uses Xperia while Samsung uses TouchWhiz.  When I tried upgrading the latest firmware on Sony and Samsung, the numbers of build in components on Samsung was way over 100 while Sony has 18.  Yes 18!  That is how much Samsung has bloated that TouchWhiz.


I uses the Power Clean app (do not mixed it with Clean Master which drain quite a bit of power itself) and often I will get notifications on CPU and Memory over utilized on Galaxy Note 3 and not on Sony.  This is how out of the box you have left for your own use for the hardware resources on Samsung.  I installed the same apps I used and I am impressed with Sony resource utilization versus what I can see on Samsung.  Are you paying more for less to use?

Sony transition do feel very smooth much smoother than Samsung as TouchWhiz is just way too heavy.  On Note 4, after changing the runtime to ART, it feel smooth.  I wonder what will happen to Sony when runtime is switched to ART?  You can do that math.

To show that TouchWhiz is heavy this is when an update is applied to Note 4 (355 apps) and Note Edge (339 apps).  Why would a stock phone off the shelf have so much apps!  What you are paying for?  I wasn't able to show the Sony Xperia Z3, but it contains 18 apps during optimizing so it was very fast in updating.


Home Screen

Home screen works almost the same except that Sony have the Google bar permanent on the top of page but you can always hide it while Samsung is a widget to choose.  Same as App drawer, you do not get back to the first page like Samsung when you reach the last page.

Apps Drawer

One thing I love about Galaxy Note 3 app drawer was it is able to create folder and check the apps to be placed in it.  I can also arrange the pages and the app drawer once reached the end will rotate back to the first page.  In Sony, this is not so.  You will need to drag app over app to create a folder just like iOS.  Once you reach the end of the pages, you have to swipe left again you do not get back to the first page.  No arranging of pages and arranging the app drawer took really awhile for me but this is due to Sony using the vanilla android style without bloating the phone.

However Sony have a slide out tool bar on the left to allow you to search or access Sony Select or Google Play store.  This seems to look something like Windows 8.  Clicking on Uninstall, shows what apps can be uninstalled.

Bloatwares
Sony comes as lean as possible almost pure vanilla android other than some Sony apps.  Samsung on the other hand have lots of apps from themselves and third party making them almost too bloated to function.  In fact, I have to disable lots of Samsung default apps to release my memory and resources e.g. S Voice, S Translate, Album, ChatON, etc. (what on earth are these even there?)

Sony does not have special apps that requires certain version to be open.  For Samsung Galaxy Note, for the newer version of S Note, the older version is not able to open them.  Meaning to say, when you have a device newer than your older Note series, the S Notes are not portable between each other.  I sort of got in the middle when I got Note 3 where my Note 1 & 2 & 8 is unable to use Note 3 S Note created notes!  For Samsung Galaxy Note user be prepared for this if you use S Note intensively especially when Samsung Marketing is marketing S Note like wonder.  Yes I use S Note intensively for work to jote notes during meetings and this experience left we strangled.

Screen
Samsung Galaxy Note 3 has a 5.7 inch screen which makes it a phablet which also make viewing any page or documents easy on the eyes.  For the Sony Xperia Z3, it is 5.2, that is 0.5 inch which I need to get used to.  Though it takes a while to adjust I do however miss the bigger screen of Note 3.  Sony Xperia Z3 has it return and Home button located in the screen which took away some vertical space but its still acceptable in most apps, it is hidden with just 3 dots.  I did not compare the density in pixel as these are marketing numbers, it is transparent to the eyes once you reach a certain degree.

Under the sun, Sony adaptive display is able to brighten the screen quite fast and well.  Comparing to Samsung, sometimes it took a while to react and times it failed to brighten the screen in time.  This is mostly due to the TouchWiz algorithm written isn't as smart.

Screen recording was a featured function when Note 1 was about to launch but end up Samsung removed it due to some reason.  Till Note 4 there is still nothing as promised when it wanted to launch the first Note series.  Sony however does have the screen recording feature.  It sort of hidden and launch through pressing the power button.

Reading news on Sony make me feel I miss slightly bigger screen like Note 3, however I was able to get use to it for awhile since I have been using phablets for years before reducing the screen size slightly.

Buttons
Both phones has the volume and power button on the edge.  For Sony Xperia Z3, it has a camera button so taking pictures feels like using a real camera.  Also in the camera app, I used to set volume as shutter key for Samsung Galaxy Note 3, with Sony Xperia Z3, I can use it as a zoom button instead.

The home, recent and return key for Sony are all in the screen which makes holding the phone in portrait or landscape an ease mentioned by my friend who first took it to try on which I wasn't aware and find it true.  Samsung on the other hand has it at the edge, so make holding the phone by the side especially on landscape mode often hitting on the buttons.

Camera
In terms of megapixel, Sony big win on Xperia Z3.  However on Galaxy Note 3, though the camera isn't as fantastic, Samsung has made a long way using software to enhance many things.  The launch of the default camera in fact lags quite a bit comparing with other phones, however they are good at making the picture colours shine via software processing.

Sony been a camera maker, makes the camera app really easy to use, the most used mode: Auto, Manual is my favourite.  You can even download more modes if you want to.  However there wasn't any grid line that can be show on the screen.  Colours are not as rich as Samsung as Sony do not add heavy processing to the pictures.  This isn't a problem where app cannot resolve.

Macro mode in Note 1 was great, after which in Note 2 and 3 it just failed tremendously.  It is so hard to capture something near.  This does not affect Sony and it still take great close up.

I love the flash from Sony, it takes picture well without over exposing the object.  It also add a soft touch filling the object nicely which Samsung fail to do so.  Samsung LED flash just always over power the object.  In fact, only Galaxy Note 1 was fine, Note 2 and 3 just did not work out properly.

In terms of Night shot, Samsung lose big time as it does too much post processing on colours this make its ability on night mode weak.  Sony however has a high ISO support of 12800, the highest among any smart phone so far.

Just note that extensive use of Camera at highest resolution of 21 Megapixel or recording of video at 4K will result increase in heat and the camera app will prompt you the warning that it will close due to increased in heat.

Sony default camera app also comes with AR, this allows detection of faces and adding theme to it.  It rather fun in groups of friends and many asked me what app was it.  I have to disappoint them this is only for Sony phone.  And yes some of my Note 3 friends, will be considering Sony Xperia Z3 instead of Note 4 since nothing really much changes between 3 to 4.

Lastly Samsung do not allow you to access your Camera irregardless you might just need to take an urgent picture for whatever reason when power is less than 20% (alternative you can install a third party app to bloat it further to get around).  Sony or any other brands so far have no such limitation.

Sound/Speaker
Sony did a great job with the speaker facing forward.  When you place the phone down or picking it up, it can still hear it.  The great thing it has two speakers one at each side when you hold it in landscape mode!

Samsung fail greatly with this.  Even Galaxy Note 4 the latest at time of writing still have the speaker at the back.  Who would thought of such a design in four iterations?

Sound produce by Sony has always been great with higher treble.  It's loud especially with two speakers comparing with Samsung which sometimes I do miss my call when placed in my pocket.

Charging
Sony Xperia Z3 has two ways of charging one via the micro USB which need to open the flap and the other is via the magnetic dock charger which can also purchase some adapter to convert your normal micro USB charger to do a stick on to charge.  Apparently, charging from the magnetic charger is faster than using the micro USB port.  So I bought this micro USB adapter via Qoo10.

For Samsung Galaxy Note 3, charging is standard and it can be faster when using power bank like Xiaomi Power Bank.

Power Management
Samsung only has a Power Saving mode, that is about it even though the latest Note 4 has some super saving mode which literally turn off everything.  Sony has full customization to this.  In fact, it setting is almost similar to an app I used to use call Juice Defender!  Those of you who have used it will know how granular you can customize it.  It shows you an estimate of the time remaining.

Here you see STAMINA mode where you can choose which app allows data when screen is off.

It also shows you the list of apps that are consuming power when the screen is off.


During my use of the phone, with STAMINA mode disabled, I wasn't able to last thoughout the day.  In fact, battery seems to goes down pretty fast.  However after I enabled STAMINA mode with only Extended usage, it got better.  This is similar to the Power Saving mode on Samsung where CPU is run at a lower clock speed.  However many reviews has mentioned Sony Xperia series devices have very good power especially Z3 which can at least last through a day or more.

My friend who own a Sony Xperia Z3 asked me to turned on Location-based Wi-Fi and also another friend owning a Z2 have it turned on mention his battery power consumption was fine.  My knowledge turning on such functionality often drain power.  However I put it to the test and indeed it was very well received.  Now I am able to last through the day (with moderate usage)!


Warranty

Samsung has the greatest problem with warranty service.  Often their only solution is to reset your firmware irregardless of issue.  If you are sure it is a hardware issue, I encourage you to demand a change of the hardware and see that they do that.  In Singapore, with great humidity, the component on Samsung device fails greatly and now they are selling Premium Care warranty for water damages by paying for it (SGD156).  They are trying to copy Apple Care+ (SGD138) with this Premium Care at a Higher Cost adds the water damage with repair while Apple still do 1 to 1 exchange.  You might be paying for a a low quality device which needs you to pay to get have it warranty protected.  My recent experience with Samsung on my Note 3 still in warranty due to corrosion from humidity in Singapore just waken me to stop using Samsung completely.  If you really need such insurance, you can look for mobile device insurance offered by many around lower than what Samsung is selling an example here.

I have friends who uses Sony way before me in the Xperia Z and Z2 and they like their service.  Since the phone are water proof, if it leaks or gotten any water damage it is covered.  Not to mention humidity does certain damage as well.

I would recommend go for device that can protect water damage and warranty it.  Do not choose a device that fails easily especially if you are in a humid country like Singapore unless you intend to change the device every year and have warranty void due to the short lifespan of the device you bought.

Summary
Though I miss some features in Samsung like Blocked Mode; where you can choose when the phone is silent for the night and customize which number is allowed; though it fail to function properly at times especially at night.

Sony has the similar function named Smart Connect; to create multiple type of events and yet able to start and launch or action on something or after a time will close or action on another which helps me replace night mode but no allowed calls.  E.g on connecting to a bluetooth camera trigger, I enabled auto launch Camera app for selfie (isn't that what it is for).

Having use Sony Xperia Z3 for more than a week now, I am getting used and loving it.  Battery wise on 4G have to be on moderate use to last through the day else if intensive usage I can still last 3/4 day much better than Note 3.

Pros
Camera
Fast and responsive
Smart Connect
Water proof, dust proof

Cons
Slightly smaller screen
Night mode no customize allow certain numbers
No fast charge
Home and App drawer page does not return to page one

Lastly if I were to buy Samsung Galaxy Note 4, and many of my friends who have asked me, I will recommend to wait for batch 2 or batch 3 shipments, as the current batches has lots of quality issues proven from Samsung Singapore Facebook Page under Post to Page.

Friday, December 19, 2014

Upgrade or Changing PS4 Hard Disk Drive Easily!

Recently have purchased multiple games for my PS4 from Amazon.  As most games are made with great details and video, the size of the DVD in the disc are not sufficient and end up after installation there will be more downloads required to have the game started.  Just to state one, GTA V is need another 50 GB of space.  This will easily fill up your default 500 GB hard disk drive (HDD) that comes with your PS4.

Luckily, Sony allows users to change their dard disk drive without voiding your warranty (unlike what Microsoft is doing with their XBOX).  So if you refer to Sony KB, you will see the steps to change your HDD.  Of course this is quite an easily job but I did hit some issues which isn't too hard to resolve but for the non-IT people, they might end up hours of troubleshooting.

So here I am to share this experience.  I did not purchase any HDD from local stores as this cost more and I do not think the need to pay so much just for gaming and if I lose the data, well too bad.  With Google, I did a search and end up with two model of external hard disk drive that are able to extracted out from their case without soldered to a USB 3.0 connector.  This is important as most external hard disk drive that are shipped out have this soldered on so that users cannot matter with them.

I found Seagate Expansion STBX2000401 2TB and Seagate Backup Plus Slim 2TB are used by many.  I end up with Seagate Expansion as it was the cheapest during Green Monday on Amazon and since it also shipped to Singapore.  Many asked me why I did not get the 2.5" external hard disk drive and end up with a external USB hard disk drive?  For whatever reason, a default 2.5" external hard disk drive is more expensive and I do not know why this is so.  Perhaps someone could advise me further.

So here are the steps that I did in a summary you can also refer to Sony Update page to be update to date here (remember to look at the New Installation Section):
  1. Download the FULL Installation PS4UPDATE.PUP here (at time of writing this is 2.02. This should be over 500 MB for New Installation and over 200 MB for Update).   Note the different.
  2. Back up my games profile and settings into a USB thumb drive (If you have PSN Plus you can backup to the PSN Plus Storage).
  3. Shutdown your PS4.
  4. Change your HDD.
  5. Press the power on button and hold it for 7 seconds and you will hear a beep sound to boot to safe mode.
  6. Select Reinitialize System (Reinstall System Software).
  7. Copy back the Game Profile and Settings back to PS4 (If you have PSN Plus, this will be copied back if it does not just copy back from PSN Plus).
  8. Reinstall all your games from Disc and download games previously downloaded from My Library (I could not find the place to download those games I downloaded previously free due to PSN Plus, so they are can found in My Library).
I hope this helps in anyone trying to upgrade or change HDD on PS4 much easier.

Enjoy your games!

Friday, December 12, 2014

WD My Passport Wireless Portable Hard Drive

When I saw Western Digital (WD) coming out with a Wireless Hard Drive with SD Slot support, I was pretty excited.  I couldn't wait and was searching for many other alternative but could not find one that matches this in terms of specification and functionality.

I am located in Singapore so I even posted in WD Singapore Facebook page to ask and finally it was release and sold in Singapore Sitex 2014 (an IT show in Singapore held during first week of Dec).  The cost of it was SGD299 for 1TB and SGD399 for 2TB with a 16GB SD card and some other freebies which I am not attracted to.

It was something I felt too heavy to swallow.  I like the SD slot availability as I took photo using my camera and it would be good to have such a storage that automatically move my picture to a storage and have my SD card free for use again which means less SD cards to purchase and carry.

It was also Black Friday followed by Cyber Monday and Green Monday in US.  So I decide to have a look at Amazon which they do ship to Singapore.  I was caught with USD219 for 2TB model and it comes with a 16TB Transcend UHS-1 Class 10 SD card as a promotion.  I wasn't able to assure if I made an order from Amazon which is a US set be warranty in Singapore.  After some research I came across WD support statement here.  So I was now assure as an end user I will be eligible.  And so I made the purchase.


Once the item arrive, I was excited.  Upon opening, I saw the power adapter (WA-10L05RU) with empty slots which I wonder what could it be.  Well after checking out, as this is a US set, they do not provide the 2-pin and 3-pin parts for the adapter which can be used in any region supporting 120V-240V.  Not a problem with a converter that will solve the problem.  I did search for the power adapter model and found that they are sold on taobao.  So if you need it you can get it like SGD10 or less.

There is a small slip of paper which is the quick installation guide.  Other documents including Product Overview can be found here.  There is also a user manual for it.

Let's take a look on the Hard Drive.
On one side, you will find the Power button, USB 3.0 connector and the WPS button which also adds as copy/move when briefly press when the hard drive is powered on.

On the left side (when power button is facing top), is the SD slot.  WD include a dummy to keep it occupied since this is on the outside unlike camera's SD slot, dust or small items might end up in here.  With a dummy slot in prevents this.

When you power on the device, you will find the LED lights up.  The first one on top with the thunder sign indicate power and the percentage it of power remaining from Fully Charge (Blue>green>Yellow>Red) to low power.  The LED below is the Wifi been turn on.  Do note when you plug the Hard Drive to a Laptop, only the power light will be on in White.  Upon still plug in with ejected mode, the Wifi will be turned on or when it is plug to a power source other than a laptop.

First time
First time when powering on, you will find the WiFi hotspot name "MyPassport", when joined to that, you will be connected to the hard drive.  Just key in the address in the web browser http://mypassport.local and you will be brought to the Administration page.

Home Section
The Home section, show you the Capacity, on clicking the Capacity section it will switch between number of files for each file category and size.  You will also see the remaining space, the power remaining, the Wifi information as well as the firmware.

On the top is Shortcut (where you create a shortcut to connect to the drive), Notification (information like firmware upgrade, etc. are shown), Question and Support (where you find links to documents and support site).

Wi-Fi Section

In this section, you will see who is connected, typically will be one person; yourself.  On the right, is the available Wifi hotspot around the area.  You can turn on and off the Wifi, by default I left it on.

In the middle, you can see your SSID for your hard drive and you can change the SSID, in my case I have changed it.  You can include a key in order to join for security reasons.  You can setup DHCP service to allow issuing of IP when a device joins to the Hard Drive network.  You can also hide your SSID if you want to be super secure.

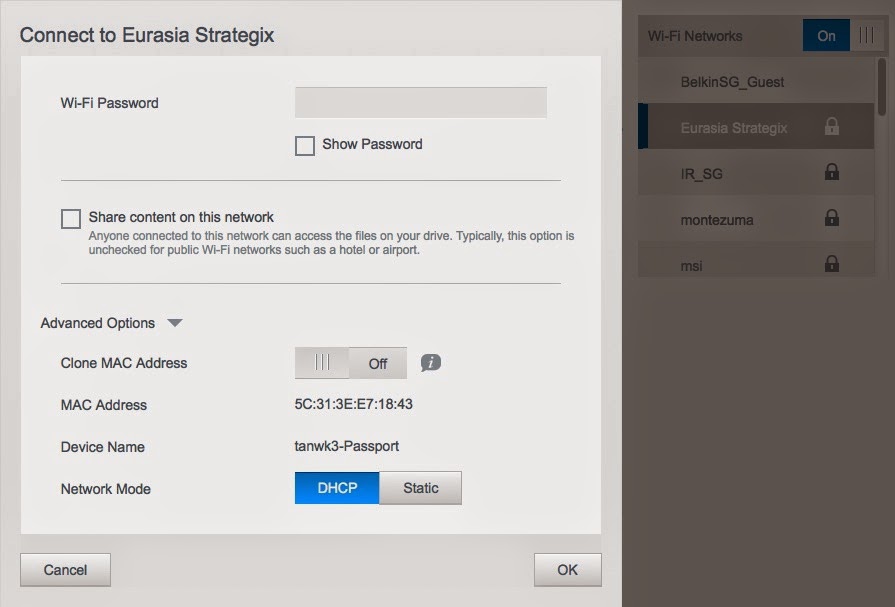
If you click on any of the Wifi hotspot, you will be shown the screen above to enter the details to join.

If you join a Wifi hotspot, you will be shown the above screen.  Wait a few moment for it to join.  It takes some time.  Once connected, you will see a check on the network you joined.  Once connected, you will have Internet connection (if you Wifi hotspot have access) for your laptop.  It seems that the hard drive did a NAT service.  But do note the drive do get pretty hot if this is used intensively on WiFi.  This is pretty useful when you are in a Hotel where you want to extend the use of a physical Internet Connection to WiFi in your room.
If a hotspot is already joined before hand, clicking on it shows the above where you can forget the network.  Here you can choose to receive DHCP IP or specify a static IP depending on the network joined.  You can also clone your machine MAC address if the WiFi hotspot has MAC address filtering.

In both cases,  you can choose to allow or not allowed to share your hard drive via the Wifi network.  If you choose to share, user using their laptop will be able to scan the network and access the drive.

Admin Section
Under this section, you can choose to create password whenever there is changes made to the hard drive setting.  You can change the drive name but by changing the drive name, the next time you browse the admin page, you will have to change to the new drive name.

SSH and FTP services are provided.  I find SSH not much used unless support provide you some guideline else playing around with it might just get your drive haywire.

FTP is useful for camera that have a WiFi auto download or using SD card like Eye-Fi.  Refer to the user guide given at top of this post to find out the details.

Hardware Section
 Here you can choose the Hard Drive to be in Performance or Power Saving state.  This is self explanatory.  You have to sacrifice Power for performance.  I did not perform any Read/Write test here as you got to be fair which setting is used.  You can search for some of the test done by other reviewers.  Also the test to carry out will need to be done with either 4 or 8 kb block which also depends on what type of files and size will mainly occupy in this hard drive.  So such test are subjective.  For me, I can wait just that few seconds to get things done.

You can also Shutdown the drive or reboot it.

Media Section 
From the screenshot you can see that here you can use DLNA.  It also shows the Media count here.  You can rebuild both the databases if you find it having inaccurate information.

Here you will also set your SD Card setting to Copy or Move.  For me, my purpose is to free up my SD card, I have selected Move.  You can set to automatic so when a SD card is sloted, it will automatically perform the action else you can briefly press the WPS button on the hard drive to start the process.  If you are not on automatic, you can start the copy/move process.

Support Section
Here you get to download system reports for troubleshooting and run some Hard Drive diagnostics.  You can also opt-in to improve this hard disk interface which I encourage everyone to do it so there will be improvement be done.

Firmware Section
Lastly, here you can either download the firmware (if you are connected to a Wifi hotspot with Internet) or someone can copy the file after downloaded and place into the SD card under Update folder, or just upload the file.  The update file should be in .bin format.  For me I actually downloaded it and did a Manual Update.

Just to take a look how the folders and file will be placed like.  Each SD Card will have it's own folder under Public>SD Card Import> Card Model.  For SD card that are slotted in the hard drive can be accessed too.  You see the Upload folder meant for Wifi connected.

WD My Cloud
At the time of writing, this mobile app was recently update and resulted in crashing upon opening.  So I was not able to test this using Samsung Galaxy Note 8.

19 Dec 2014 Update: I was able to launch WD My Cloud after changing to Sony Z3.  Seems like its device specific.  You will need to be connected to My Passport Wireless Wifi hotspot even though if is is joined to your home network else you will not be able to access it.

After joining My Passport Wireless Wifi hotspot, you will see it pop up in WD My Cloud application.  Clicking on it allows you to view the various options.

It is able to do the same via the web interface.  The browsing of the files and folders are acceptable however loading pictures seems rather slow showing the thumbnails.

You will have internet access if your My Passport Wireless is joined to a network that has Internet access.


Verdict
In summary, WD My Passport Wireless did a great job.  I like the web interface is nicely done and its simple to use.  However the mobile app need to be improved and is not usable since the last update before this was written.

Pros
  • Simple to use web interface.
  • Using the WiFI hotspot from the hard drive to gain Internet access especially in a Hotel room.
  • SD Slot able to perform automatic copy/move.

Cons
  • Battery life will be an issue if WiFi is constantly been used.
  • Connection to the drive to WiFi network can be faster.
  • Brief press of WPS to copy/move file from SD card has not visual indicator process executed.
  • WD My Cloud mobile app is not working.  Working on certain device.